| View previous topic :: View next topic |
| Author |
Message |
Ronanjordan
**
Joined: 26 Mar 2010
Posts: 60
Location: Ireland
|
 Posted: Sat Jul 03, 2010 22:50 Post subject: Roofrack Posted: Sat Jul 03, 2010 22:50 Post subject: Roofrack |
 |
|
Hey all
Just started making a rack yesterday for my 2002 lwb landcruiser.
Its 2 metres long and. 1.2 wide, going to have 4 lamps on the front.
Only my2nd time welding and I have the main shape made. Going to get pix up but away at work for next 2 weeks.
Still don't know how high I'll go with the rack tho, maybe 3 to 4 inches. Any ideas welcome
than, Cant wait to finish it!! |
|
| Back to top |
|
 |
Google
Sponsor

|
| Posted: Sat Jul 03, 2010 22:50 Post subject: Google Ads keep this community free to join! |
|
|
|
|
| Back to top |
|
|
ignat
***

Joined: 29 Nov 2008
Posts: 145
Location: Sutton, Surrey
|
| Posted: Sun Jul 04, 2010 15:01 Post subject: |
|
|
looking forward to the pics!
How are you mounting it? Do you have gutters or roof rails?
_________________
'97 Colorado 3.0 TD LWB
LML125 Scooter
 |
|
| Back to top |
|
|
Ronanjordan
**
Joined: 26 Mar 2010
Posts: 60
Location: Ireland
|
| Posted: Sun Jul 04, 2010 18:15 Post subject: |
|
|
So far all I have is a rectangle made of angle steel welded at the corners.
I was thinking about putting 20mm box or similar onto the underside of the frame to support anything goin on top,
I have roof rails and bars going across which the rack frame can sit onto at the moment, if I place the box in the correct place I could u-bolt through the 20mm box onto the crossbars.
Any other ideas welcome, as it's my first time doing one!!!! |
|
| Back to top |
|
|
uk_vette
Lifetime member

Joined: 29 Oct 2007
Posts: 1422
Location: Warrington, Cheshire
|
| Posted: Sun Jul 04, 2010 20:06 Post subject: |
|
|
Are you making out of mild steel or aluminium?
if your making from mild steel, you will be surprised how heavy it can become.
Here is mine/

'vette |
|
| Back to top |
|
|
Ronanjordan
**
Joined: 26 Mar 2010
Posts: 60
Location: Ireland
|
| Posted: Sun Jul 04, 2010 21:16 Post subject: |
|
|
@vette
how is that fitted Or secured to ur roof?
Mine is 25 mm angle back n sides and 40 mm on the front upsidedown to bolt lamps underneath.
Going to make the basket sides at the back and 20mm box across like yours . |
|
| Back to top |
|
|
uk_vette
Lifetime member
Joined: 29 Oct 2007
Posts: 1422
Location: Warrington, Cheshire
|
| Posted: Sun Jul 04, 2010 21:51 Post subject: |
|
|
Hello Ronan,
On the 120 series, the roof rails are not solid.
They have a void in them.
I have fitted 5 of these, there nick name is 'zeberdies' they are used in the electrical industry for assembly of unistrut.

I did fix angle brackets to all 10 of the zeberdies.
Like this

Then when I had the 10 angle brackets spaced as per the cross pieces of the roof rack, I an a friend lifted the roof rack onto the angle brackets.
I drilled 8mm holes through the cross pieces of the roof rack, and nut and bolted.
Now to fit and remove the rack, I just undo the bolts that are bolting the angle bracket into the trapped zeberdie in the roof rails.
'vette |
|
| Back to top |
|
|
Ronanjordan
**
Joined: 26 Mar 2010
Posts: 60
Location: Ireland
|
| Posted: Sun Jul 04, 2010 22:11 Post subject: |
|
|
Is there no limit to uses for unistrut?????
I am an instrument tech and use it sometimes. Goin offshore in the morning for 2 weeks. Hope to get back onto the rack as soon s I get home and get pics up too.
Will check my cross rails to check on using zebs. Great idea by the way!!!!! |
|
| Back to top |
|
|
regthing
Lifetime member

Joined: 24 Dec 2007
Posts: 551
Location: Dunoon, Scotland
|
| Posted: Sun Jul 04, 2010 22:17 Post subject: |
|
|
| uk_vette wrote: |
| there nick name is 'zeberdies' |
Slightly off topic but I think you mean 'Zebedee' from "The Magic Roundabout" fame.


PS. Anyone for some wine?
_________________
'98 Colorado KZJ95 1KZTE
General Grabber AT2s, Ironman Suspension and working my way round the worn bits!
 |
|
| Back to top |
|
|
Ronanjordan
**
Joined: 26 Mar 2010
Posts: 60
Location: Ireland
|
| Posted: Sun Jul 04, 2010 22:23 Post subject: |
|
|
I normally call them spring nuts.
But from what I have heard you're right with th magic roundabout: |
|
| Back to top |
|
|
uk_vette
Lifetime member
Joined: 29 Oct 2007
Posts: 1422
Location: Warrington, Cheshire
|
| Posted: Sun Jul 04, 2010 22:55 Post subject: |
|
|
he , he , he ,
Zeb.

'vette |
|
| Back to top |
|
|
Ronanjordan
**
Joined: 26 Mar 2010
Posts: 60
Location: Ireland
|
| Posted: Tue Jul 27, 2010 21:39 Post subject: |
|
|
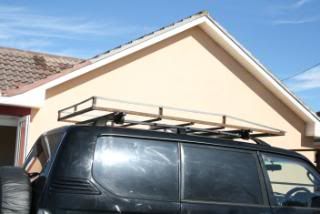
Well after a few hours with welder and grinder goin flat out it's finished.
Got 20mm box for base. 8 pieces goin across and used 20mm flat bar for high sides. Will get pix up tomorrow as gettin dark here now.
Just needs dipping and painting, then on and wire it all up!!! Can't wait |
|
| Back to top |
|
|
Ronanjordan
**
Joined: 26 Mar 2010
Posts: 60
Location: Ireland
|
| Posted: Wed Jul 28, 2010 19:36 Post subject: |
|
|
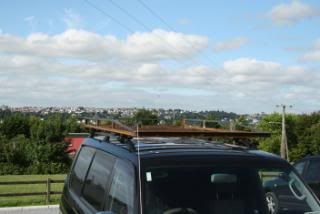
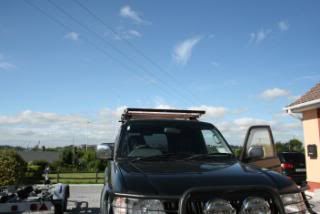
Got a few pictures this evening, quite happy with the fit and not that heavy either, the lights arent on it yet as it must go for dipping and painting yet.
How do you attach a piture.
Please someone explain in the simplest way.
Thanks. |
|
| Back to top |
|
|
ignat
***
Joined: 29 Nov 2008
Posts: 145
Location: Sutton, Surrey
|
|
| Back to top |
|
|
Ronanjordan
**
Joined: 26 Mar 2010
Posts: 60
Location: Ireland
|
| Posted: Thu Jul 29, 2010 8:59 Post subject: |
|
|
I have tried photobucket, so hope this works!!!!! Thanks Ignat
 |
|
| Back to top |
|
|
|


