
|
The Toyota Landcruiser Owners Club
Landcruiser Club - Dedicated to Toyota Landcruiser, Amazon, Colorado and Prado Owners
|
| View previous topic :: View next topic |
| Author |
Message |
BlueRock
**
Joined: 23 Mar 2011
Posts: 82
Location: Somewhere in Europe
|
 Posted: Mon May 09, 2011 2:14 Post subject: my 90 series hidden winch mount install Posted: Mon May 09, 2011 2:14 Post subject: my 90 series hidden winch mount install |
 |
|
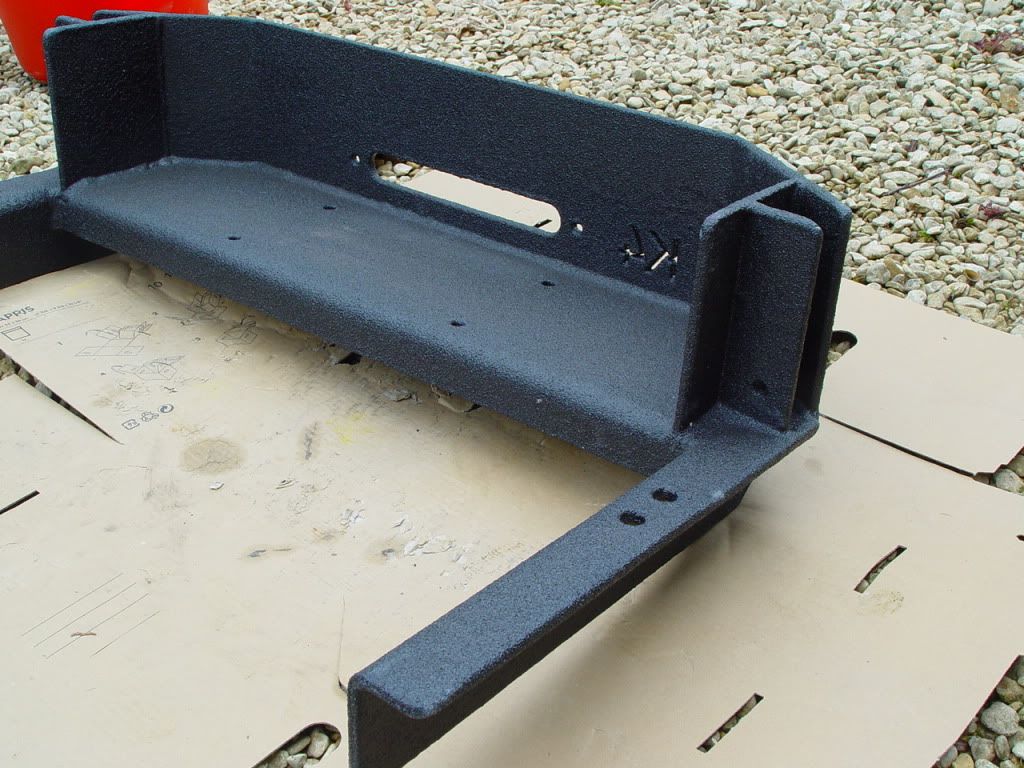
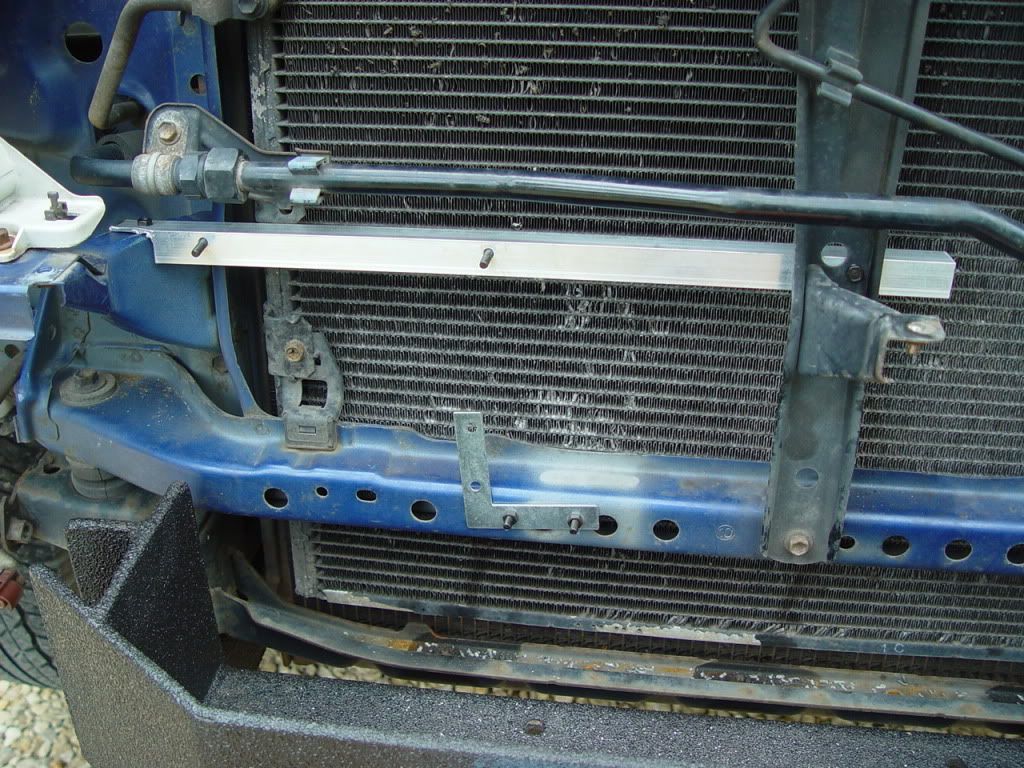
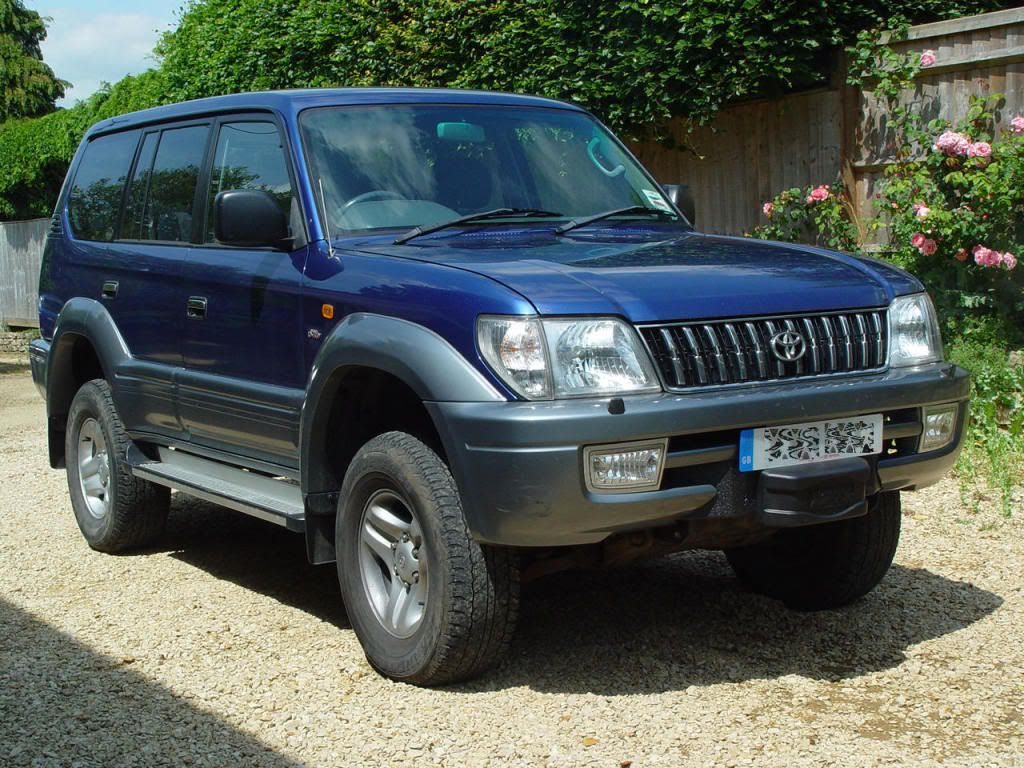
I bought a hidden winch mount from J66P and installed it this weekend. The mount itself is one heavy duty piece of solid steel...
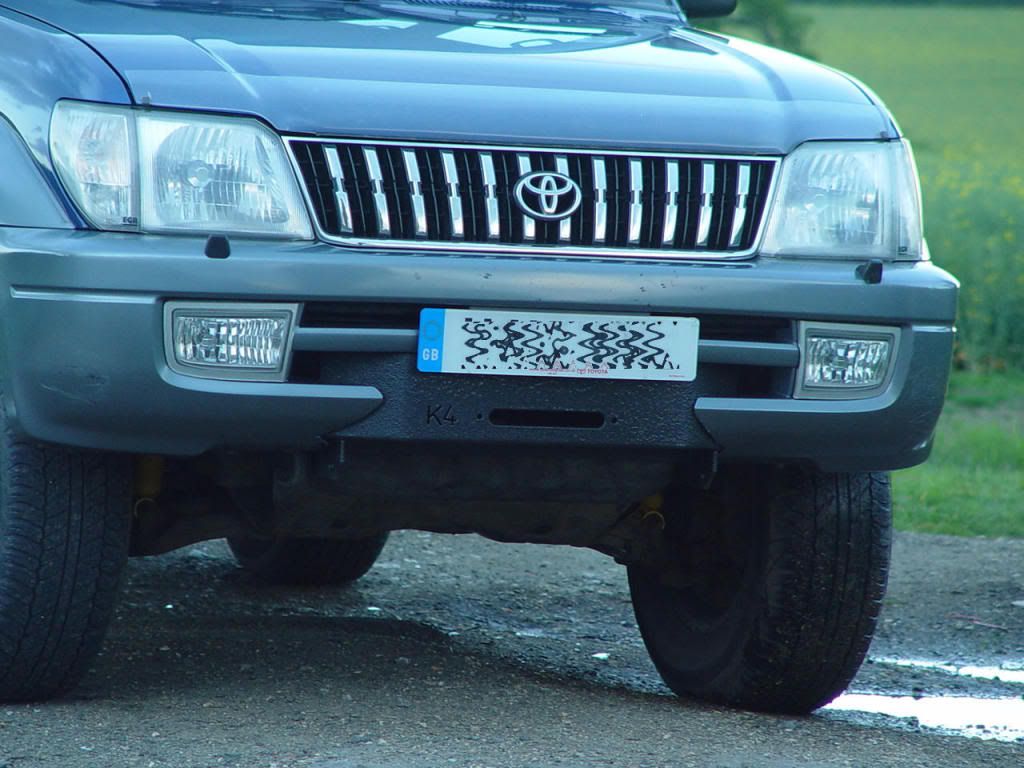
Here is what it looks like, once installed. Note that I haven't installed the winch yet...
A couple of comments. The mount itself is made of thick steel, all welded into one solid piece. It looks indestructible. Don't drop it on your foot, as it weighs 21 kg. It is mounted to the chassis using only 4 boltsthe ones used for the eye hooks. But, because the rails go way back, almost to the front suspension mounts, the bolts apply plenty of leverage no matter whether you push up or down. Once those bolts are torqued to spec, it's held in place by friction between the chassis and the rails, and it's not going to move. The whole setup seems much stronger than your typical winch bumper.
So, I'm figuring this can handle extreme winch angles, without any difficultiesassuming the fairlead bolts can handle it. I jumped up and down on the winch mount (when the bumper was still off), and I couldn't feel any movement. Moreover, it looks like this can be used as a jacking point for a Hi-Lift jack.
The winch mount sits a bit lower, and further back, than a typical winch bumper mount. This seems to put the winch more toward the vertical centre of gravity, which can have an advantage. When you typically start winching with a bumper-mounted winch, you'll notice that the front suspension gets pushed down. That's because the raised height and mounting system acts as a lever, applying downward force on the front and upward force on the back. With the lower mounting, this effect is reduced, or possibly even eliminated. That means better winching on soft ground. As for the approach angle, it seems about the same as the stock plastic bumper. It might be a bit worse if a roller fairlead is mountedI'll let you know.
Installation does require some work, but nothing too difficult. The main challenges I ran into were:
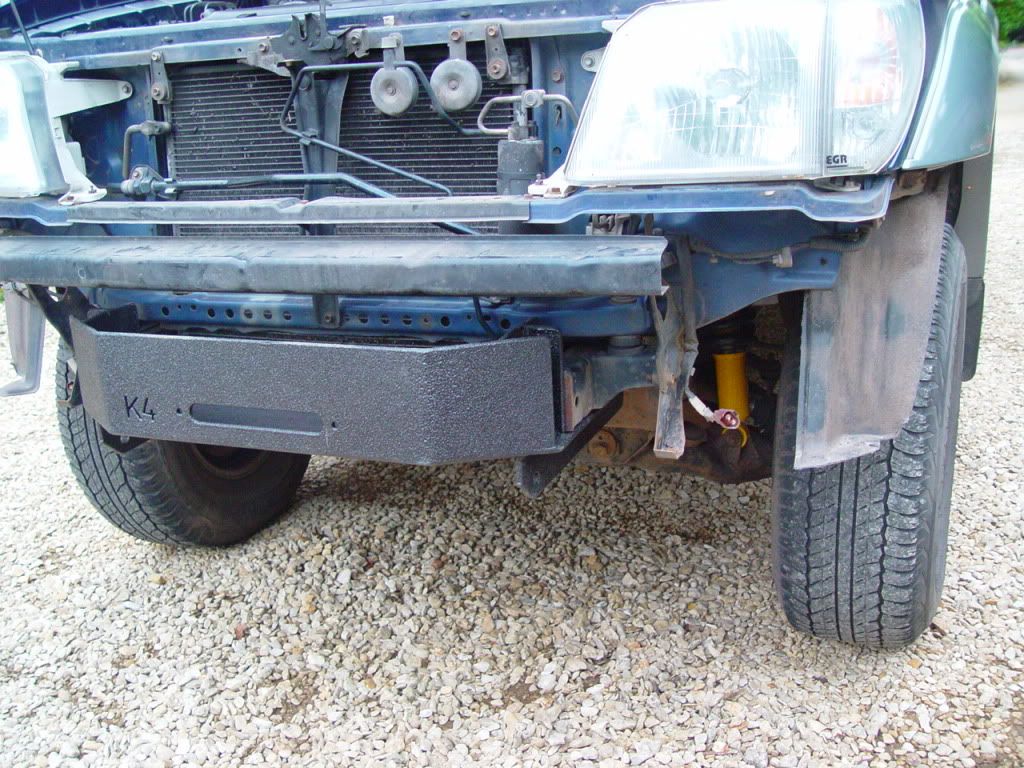
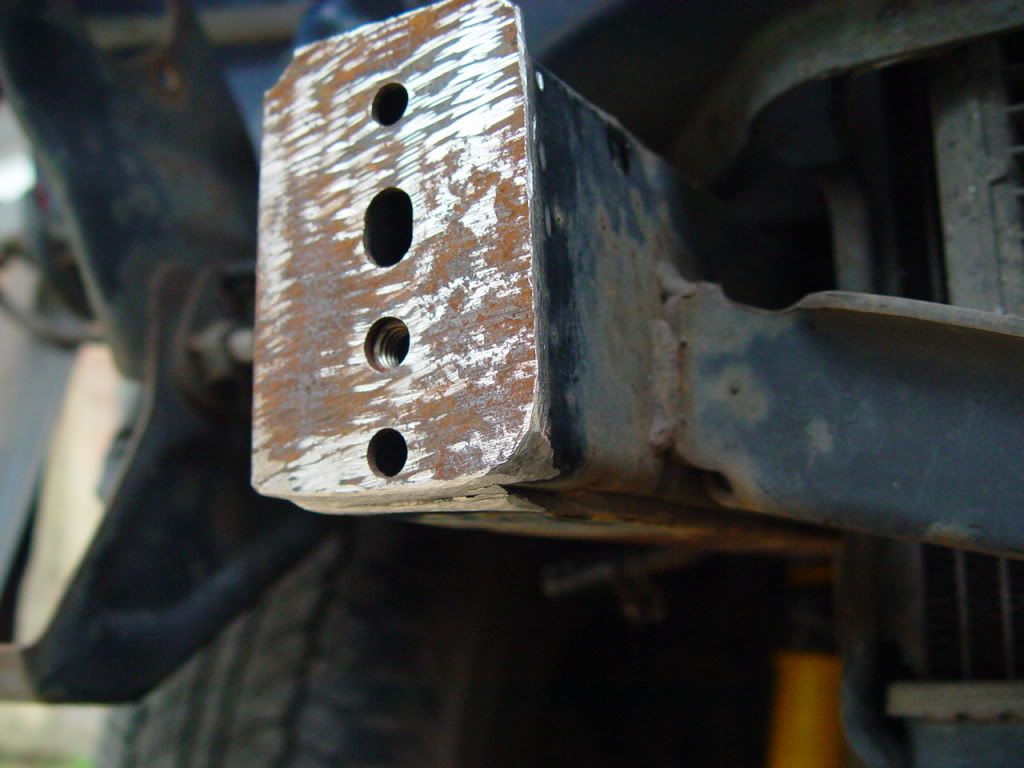
1. Grinding down the tabs on the front chassis mounting. I ground the two inner tabs, and then cut the two bottom tabs, using an angle grinder. I wanted to make sure the bottom tabs didn't come into contact, so I shaved off an extra millimetre or two...
2. Trimming the bumper. I tinkered quite a bit to see if I could leave some extra material on the bottom. But, it seems this is not possible unless I was to cut some kind of zig-zag pattern and install lower mount extensions. So, I just cut it in the same way that J66P did. That left me with two of the four lower bolt mounts, which is still pretty reasonable.
3. Skid plate. When I first tried to fit the winch mount, I discovered that it couldn't fit past the skid place, which was about 1 cm too wide. So, I had to remove it (both plates), and do a little bit of bending with a wrench and hammer. No big deal. Once I re-mounted it, I had a couple of millimetres of clearance on either side.
So, I'm quite pleased right now. This is a solid mount, and it looks pretty classy. I'll be using wire rope, but I haven't yet decided whether to go with roller or Hawse fairlead. The roller should be able to handle the more extreme angles, and I think it will look good with a fairlead cover on. The Hawse would have a smaller profile and better approach angle. I'll be installing the winch next weekend.
FYI, J66P's website is at: http://k4designs.webs.com
QUESTIONS
1. What should I torque the bolts to? They are labelled '8.'
2. The coating is thick and heavy duty. I'm wondering whether I should scrape this away where the washers for the bolts come in contactto make sure there is metal to metal contact? Maybe even scrape the entire surface area of the rails that are in compression against the chassis? Would that make any difference?
3. Is there such a thing as a Hawse fairlead cover?
4. I remember seeing a roller fairlead cover that had a harness on the inside for the winch hook. As one pulled in the winch rope, the cover would securely lock into place. It had a handle on the outside. Does anyone know where to get one of these? I thought I saw it on an 80 series.
BlueRock
2001 LC90 D-4D, just lifted, and now with winch mount |
|
| Back to top |
|
 |
Google
Sponsor

|
| Posted: Mon May 09, 2011 2:14 Post subject: Google Ads keep this community free to join! |
|
|
|
|
| Back to top |
|
|
k-4
*
Joined: 03 Aug 2010
Posts: 35
Location: Sheffield
|
| Posted: Mon May 09, 2011 16:53 Post subject: |
|
|
| that looks well cool and i like the idea of a high lift point. |
|
| Back to top |
|
|
J66P
****
Joined: 21 Apr 2010
Posts: 439
Location: Doncaster
|
| Posted: Mon May 09, 2011 19:56 Post subject: |
|
|
cracking write up matey and thanks for the praise 
Any chance of me picking the bones and using it as part of the fitting guide along with your photos
I did have the same thought on the mounting bolts but to be honest I have used mine a few times and the first couple of times I just nipped the bolts up, they dont move now, I think if I was a bot more hand fisted i the fiorst place it would have pushed the excess coating out the way. One thing for sure you will struggle to scrape it away
_________________
1998 Toyota Landcruiser Colorado 3.4 V6 (sold)
2001 VW 2.8 V6 Caravelle Surf Bus (sold)
2010 Passat Bluemotion Highline Plus (gone)
VW Amarok BiTdi |
|
| Back to top |
|
|
BlueRock
**
Joined: 23 Mar 2011
Posts: 82
Location: Somewhere in Europe
|
| Posted: Wed May 11, 2011 1:46 Post subject: |
|
|
Sure, feel free to use the info. I have some additional pics too.
I'll post more, once I install the winch. It's scheduled to arrive tomorrow. |
|
| Back to top |
|
|
BlueRock
**
Joined: 23 Mar 2011
Posts: 82
Location: Somewhere in Europe
|
| Posted: Sat May 21, 2011 0:31 Post subject: |
|
|
Winch never arrived. In fact, it was only after several phone calls that I learned it had not even been dispatched! After repeated excuses, promises, and more delays, I finally cancelled the order. I don't think I'll ever do business with 'Proppa' again. I ordered from another retailer and it arrived the next day.
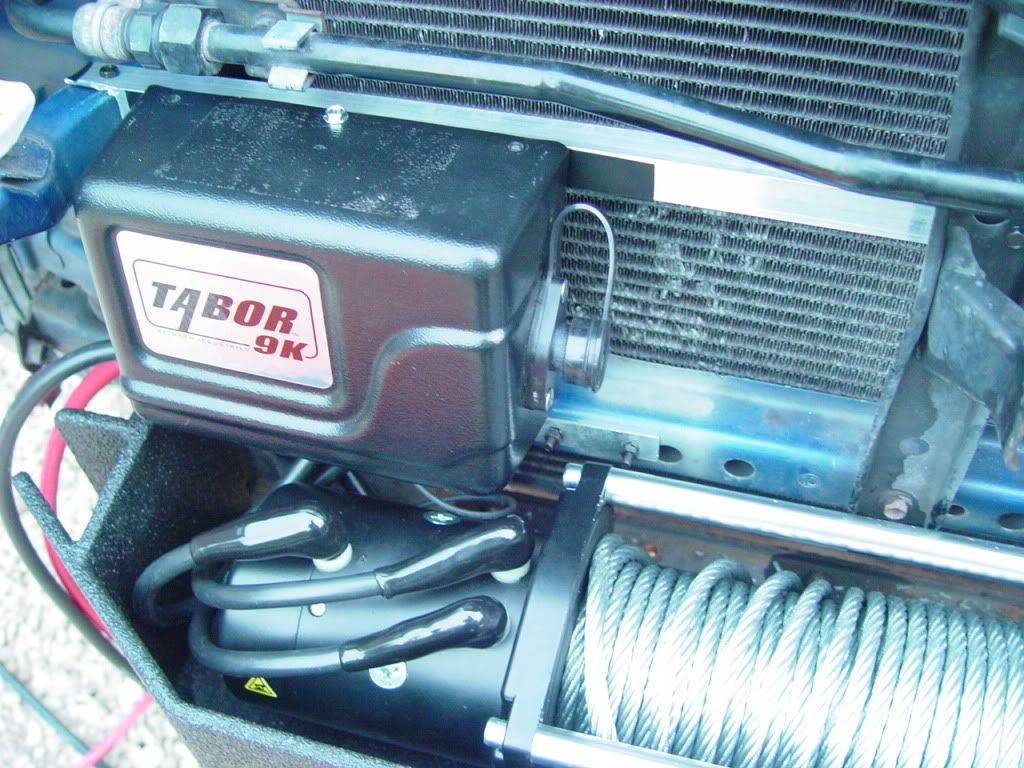
So, I'll be installing the winch this weekend. Here's a preview...
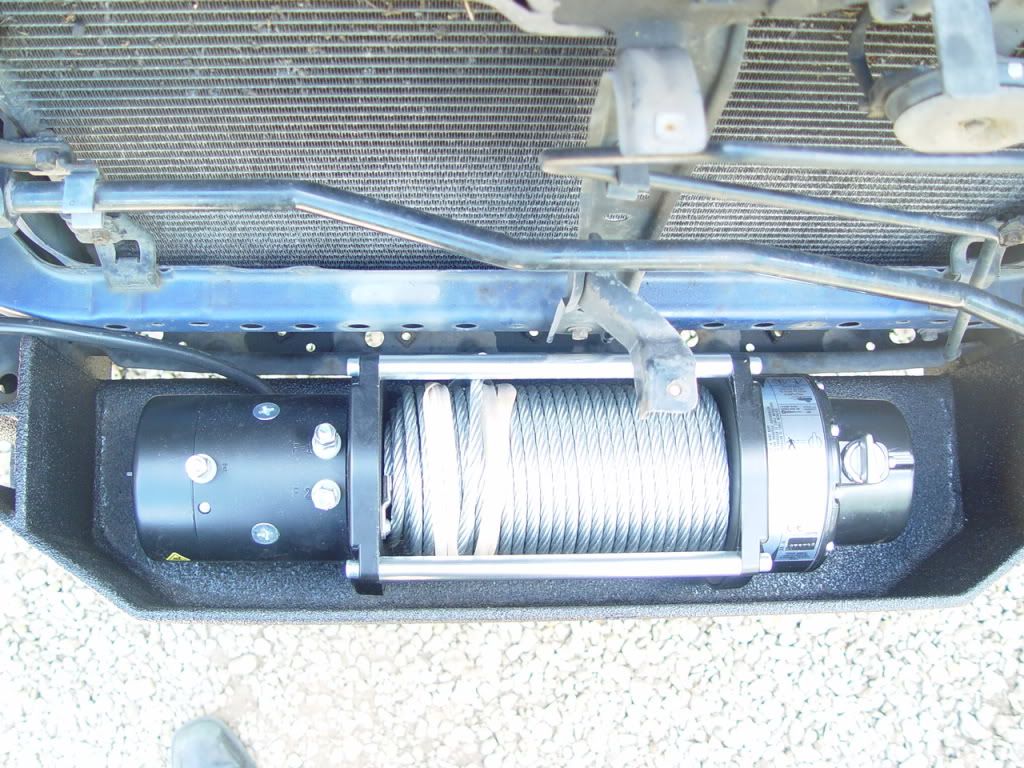
The Warn Tabor 9K fits in the mount just fine, with about 2 cm to spare, next to the motor.
One thing I noticed is that the main mounting bolts, which I had tightened fairly hard with a normal half inch ratchet, were quite loose, after two weeks. The thick coating material on the mount slowly compresses, when under pressure. So, the mounting bolts will need to be re-tightened several times, perhaps over a few weeks. The torque value for that bolt type (M12x1.25, 8T) is 110 Nm. It's important to make sure this is tight, so that the mount is held on by friction.
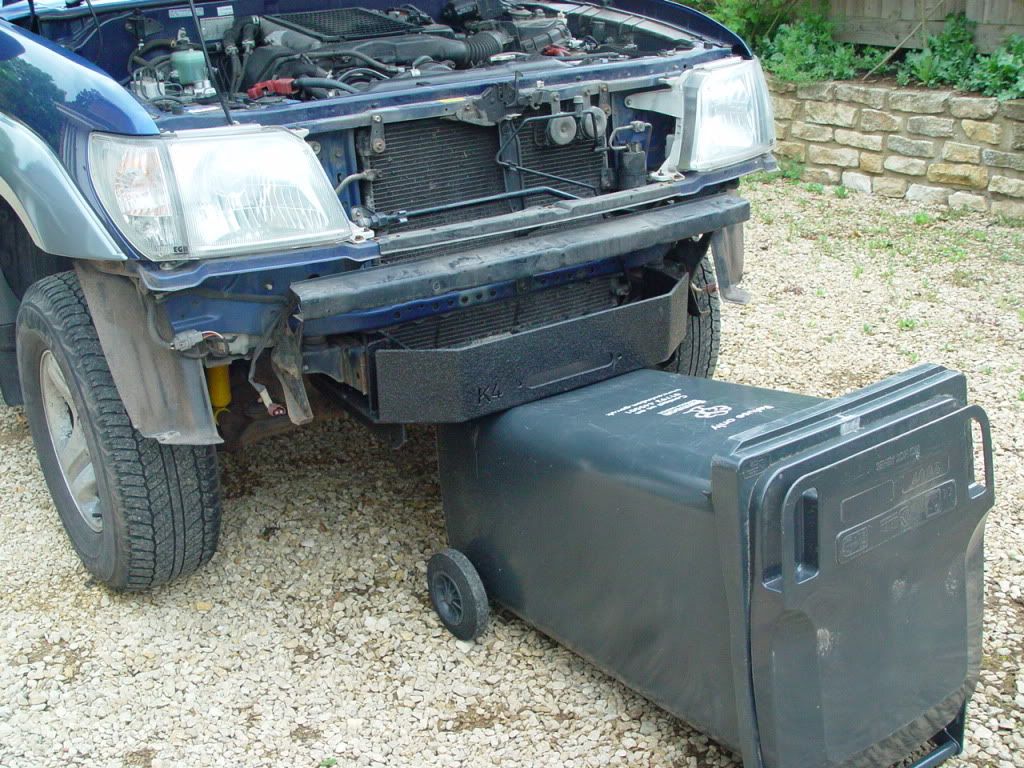
BTW, here is what I used to hold it up, while putting in the bolts...
BlueRock |
|
| Back to top |
|
|
BlueRock
**
Joined: 23 Mar 2011
Posts: 82
Location: Somewhere in Europe
|
| Posted: Mon May 23, 2011 0:43 Post subject: |
|
|
It's done!
More to follow...
BlueRock |
|
| Back to top |
|
|
k-4
*
Joined: 03 Aug 2010
Posts: 35
Location: Sheffield
|
| Posted: Mon May 23, 2011 12:52 Post subject: |
|
|
| looking very nice , need to get on with mine |
|
| Back to top |
|
|
BlueRock
**
Joined: 23 Mar 2011
Posts: 82
Location: Somewhere in Europe
|
| Posted: Mon May 30, 2011 19:09 Post subject: |
|
|
Finally, here is the write-up on the remaining bits...
1. The coating material on the winch mount compresses under load. It is therefore necessary to re-torque the bolts several times, after installation. I figure it's better to do this than scrape away the material. This is relatively easy to do, although it's a bit trickier for the fairlead bolts, as you can't get a torque wrench into there, once everything's mounted.
2. The coating material also shrinks the sizes of the various mounting holes. This is very easy to fix with a drill. No drilling into metal necessary (except a tiny bit for the fairlead holes, as the bolts that came with my winch were a tad thicker).
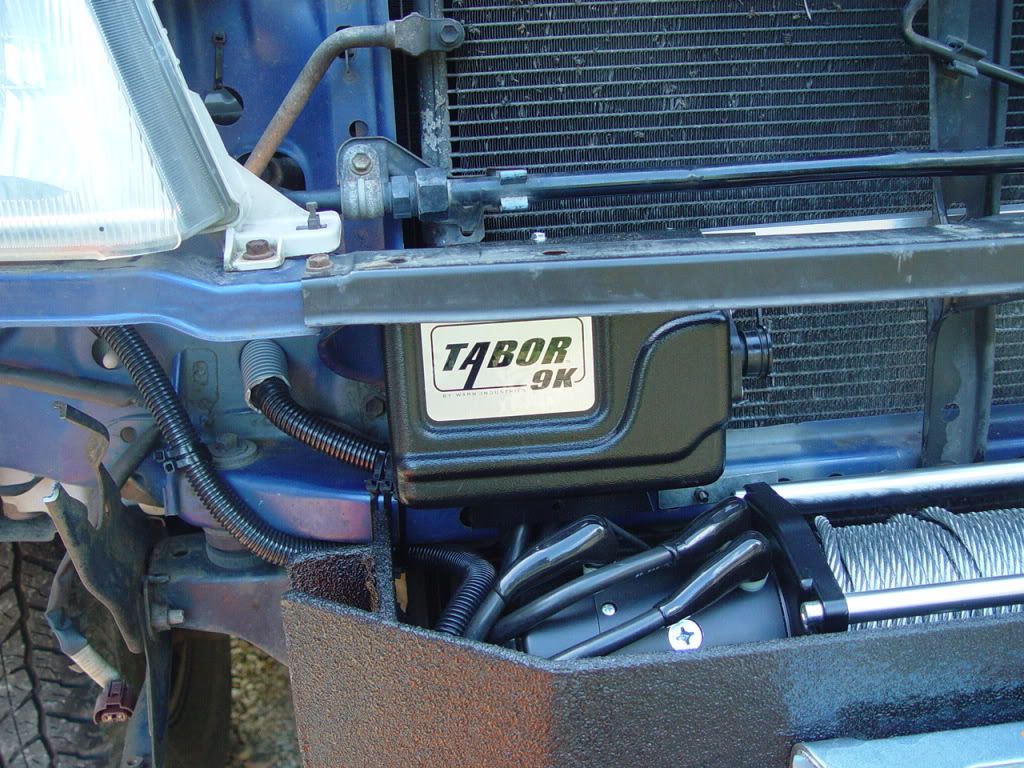
3. The installation of the solenoid box was a bit challenging. I figured the best location would be behind the grill, as that way I wouldn't have to take up valuable space in the engine bay and run four cables instead of two. However, this necessitated creating some custom brackets. I made this out of some aluminium 'L-beam' I found in the local hardware / DIY store...
And, here it is with the solenoid box mounted. I rotated the box cover by 180 degrees and drilled more holes in the back. Electrical tape was used to prevent contact between the aluminium and steel surfaces.
The solenoid box connector can be reached using one hand through the top of the grill opening
4. The interior mini-bumper had to be cut off, in order to allow easy access to the winch clutch lever. It's relatively useless anyway, as the winch mount is effectively a solid bumper now. (I think it would be possible to do this without cutting it, if some additional main bumper trimming was done, or depending on the design of the clutch lever.) The end pieces had to remain, in order to mount the bottom of the rubber bumper...

5. This is how I ran the cables...
6. There were a couple of places I had to use a grinder to do a little bit of trimming. Also, I had to drill out one of the bolts I managed to snap.
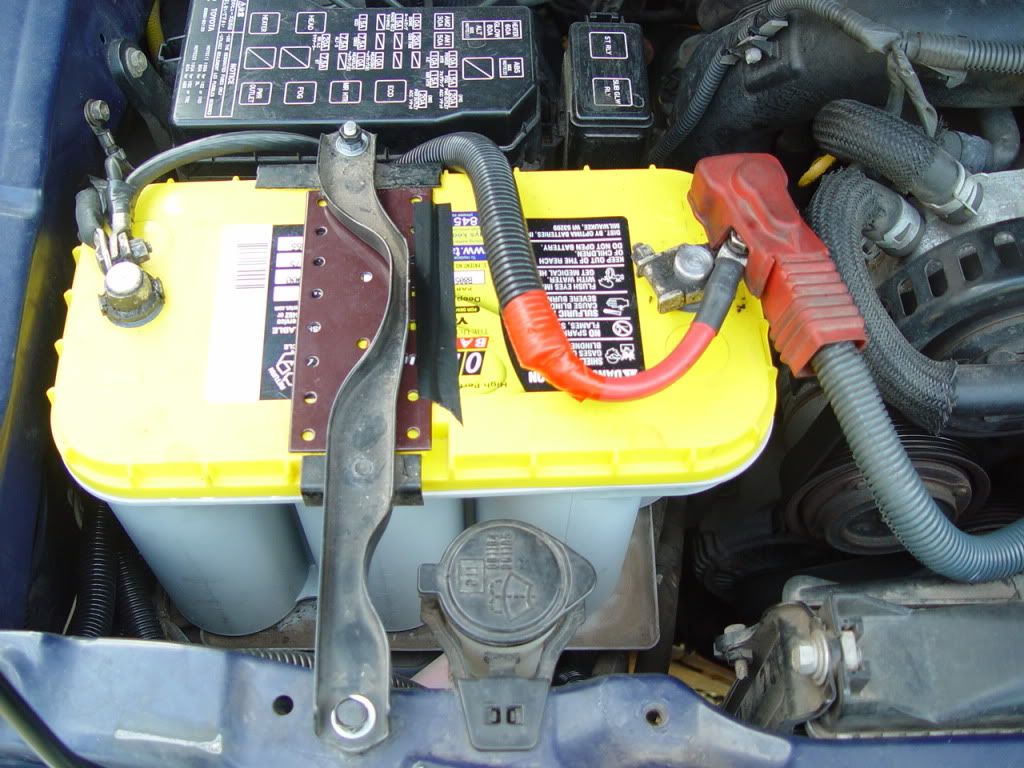
7. Finally, I installed a pair of Optimal Yellow Top batteries (the heavy duty models). It's probably overkill, but part of the motivation was to add a bit more weight to the front. I currently have them hooked up in parallel.
The battery mounting brackets have been slightly modified to accommodate the increased height (about 2 cm). I used a threaded rod, which I bent at the end, to extend the back end. And, I added a metal plate to distribute the force over a wider area on top. This should be just as strong as the original mounting, provided the cold-bending of the rod has not weakened it too much. Washers were used to raise the front mounting point. This is the battery to which I attached the winch cables...
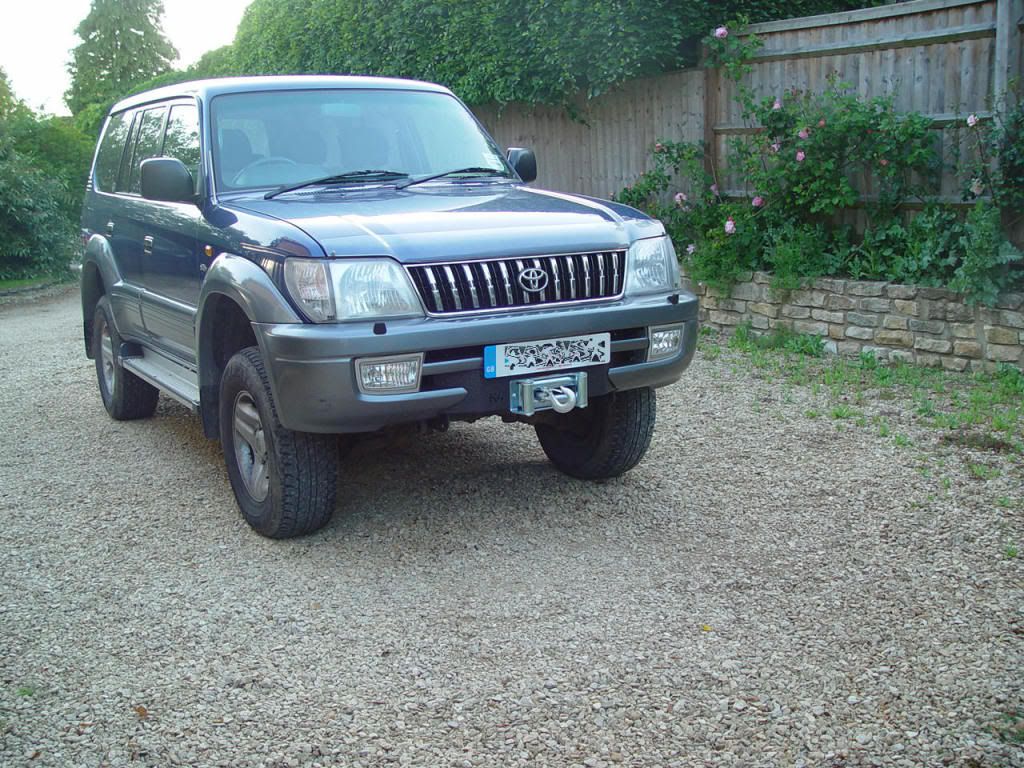
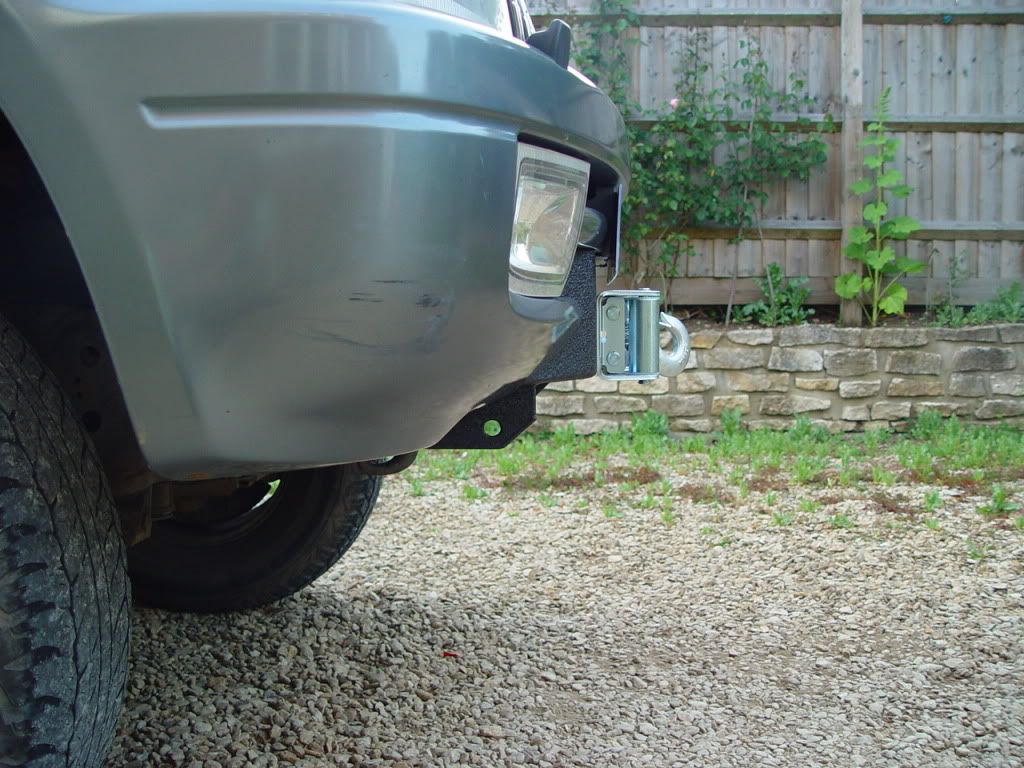
Here is what the approach angle looks like, with the roller fairlead installed...
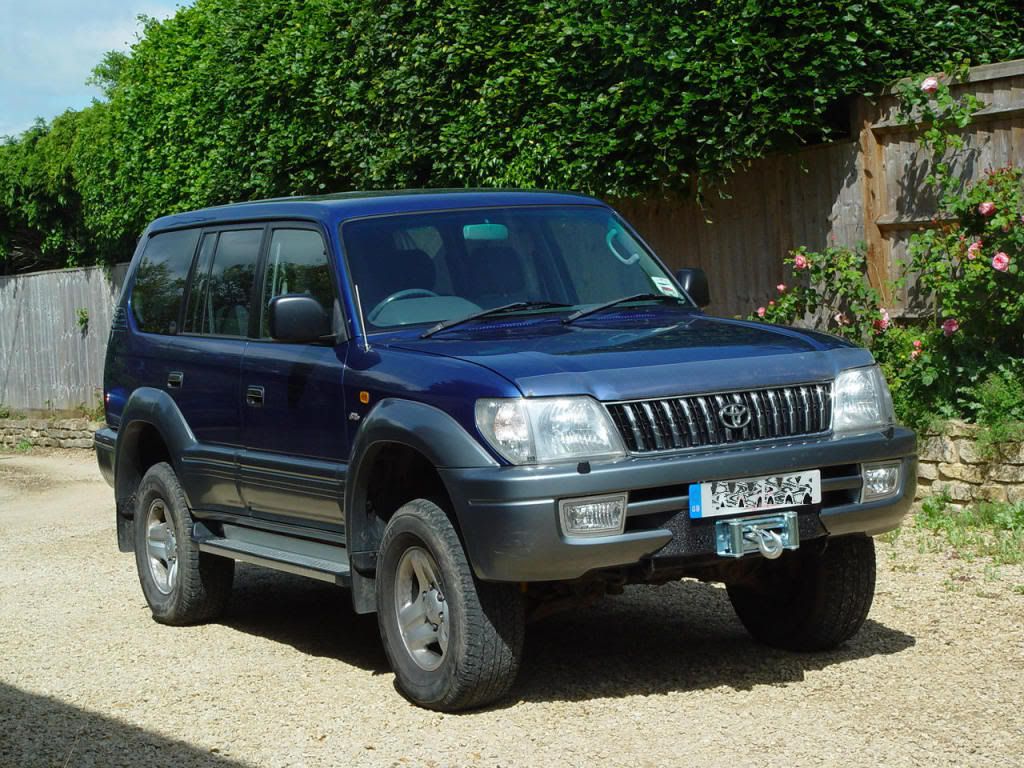
And, here she is, in the sunshine...
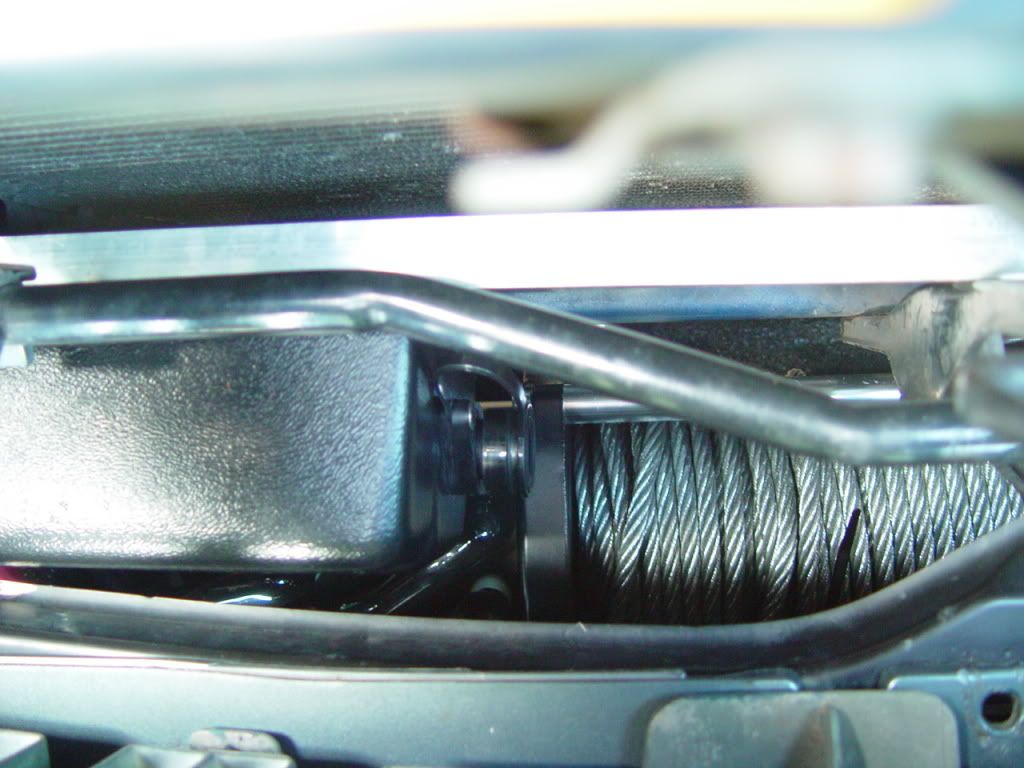
Once I stretch out the winch cable (and deform the loop at the end), I figure I can also install a winch cover. It doesn't fit, right now, as the hook doesn't bend all the way back.
How much does this all weigh? About 65 kg:
+ 20 kg hidden winch mount
+ 31 kg winch / solenoid / fairlead
- 7 kg inner bumper tube + other bits removed
+ 21 kg Optima batteries net: (27.5 kg 17 kg) x 2
One thing I haven't decided, yet, is whether or not to disconnect the air bags. With the solid mounting to the frame, presumably the system could be set off with a lower speed collision.
BlueRock
_________________
2001 LC series 90 D-4D RHD w/factory rear locking diff
- 3" lift: OME 882/892X (55/70 mm) + 32" BFG A/T KO2
- winch: Warn VR EVO 12; hidden mount (K-4 Design)
- diff drop; diff breathers; dual Optima batteries w/ground cable |
|
| Back to top |
|
|
J66P
****
Joined: 21 Apr 2010
Posts: 439
Location: Doncaster
|
| Posted: Mon May 30, 2011 19:37 Post subject: |
|
|
fantastic write up matey, finished off looks it spot on, one more little mod I have done to mine is knock up a radiator protection guard just in case the wire got tangled up and went that way. I just used a bit of tin and picked up on the middle sump guard bolt 
If you want another degree or 2 on the approach angle got for a plasma rope with aluminium fairlead
_________________
1998 Toyota Landcruiser Colorado 3.4 V6 (sold)
2001 VW 2.8 V6 Caravelle Surf Bus (sold)
2010 Passat Bluemotion Highline Plus (gone)
VW Amarok BiTdi |
|
| Back to top |
|
|
RADIOTWO
******

Joined: 18 Nov 2005
Posts: 816
Location: GLOSSOP
|
| Posted: Mon May 30, 2011 20:44 Post subject: |
|
|
J66P
You have a PM
_________________
2004 Amazon 100 series
Steve |
|
| Back to top |
|
|
joe lane
***

Joined: 28 Jun 2009
Posts: 138
Location: COVENTRY ENGLAND
|
| Posted: Mon May 30, 2011 20:52 Post subject: re: winch clutch |
|
|
hi, nice job there, with regards to your lever, there is an air assist solenoid on the market, cant be that hard to source an electric one of some sought, just a thought
keep it up
_________________
release the diff lock three |
|
| Back to top |
|
|
J66P
****
Joined: 21 Apr 2010
Posts: 439
Location: Doncaster
|
| Posted: Mon May 30, 2011 21:19 Post subject: |
|
|
Yep as Joe says the air assist one is great but not cheap, I think its a Goodwinch unit
_________________
1998 Toyota Landcruiser Colorado 3.4 V6 (sold)
2001 VW 2.8 V6 Caravelle Surf Bus (sold)
2010 Passat Bluemotion Highline Plus (gone)
VW Amarok BiTdi |
|
| Back to top |
|
|
BlueRock
**
Joined: 23 Mar 2011
Posts: 82
Location: Somewhere in Europe
|
| Posted: Sun Jun 26, 2011 1:02 Post subject: |
|
|
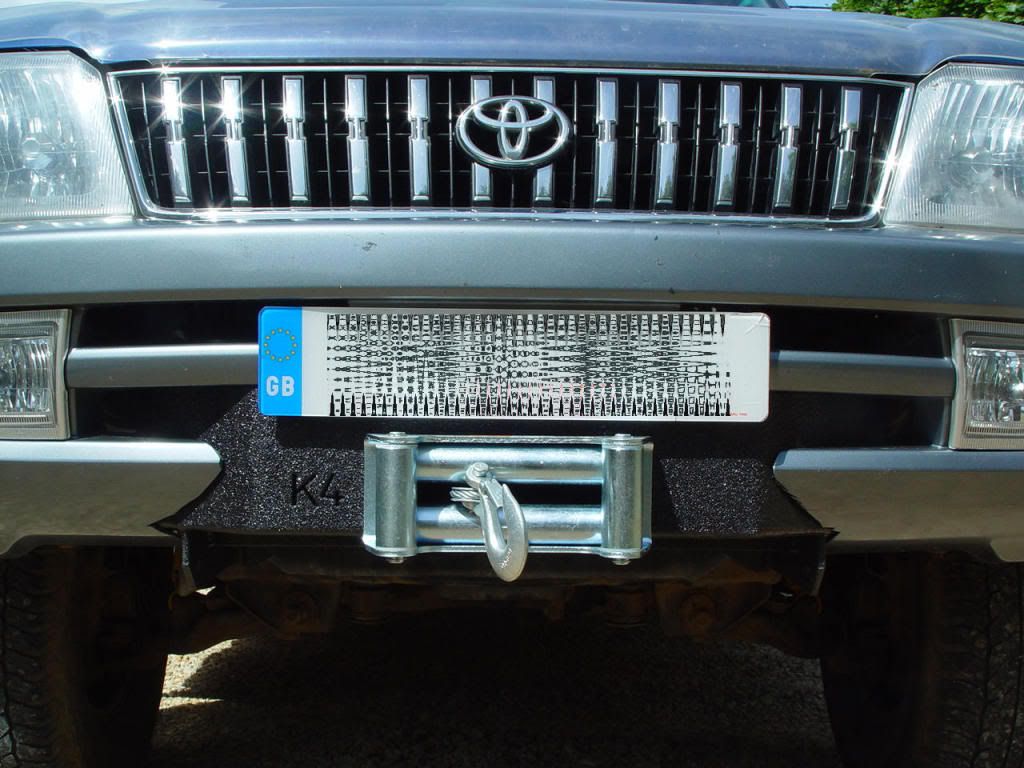
Now with the roller fairlead cover (spray painted black)...
The winch is barely noticeable.
In fact, if you didn't know what to look for, you probably wouldn't know it was there!
BlueRock
_________________
2001 LC series 90 D-4D RHD w/factory rear locking diff
- 3" lift: OME 882/892X (55/70 mm) + 32" BFG A/T KO2
- winch: Warn VR EVO 12; hidden mount (K-4 Design)
- diff drop; diff breathers; dual Optima batteries w/ground cable |
|
| Back to top |
|
|
g wizz
**
Joined: 18 Mar 2010
Posts: 78
Location: cambs
|
| Posted: Sat Jul 02, 2011 4:38 Post subject: |
|
|
Bang tidy  |
|
| Back to top |
|
|
J66P
****
Joined: 21 Apr 2010
Posts: 439
Location: Doncaster
|
| Posted: Sat Jul 02, 2011 14:17 Post subject: |
|
|
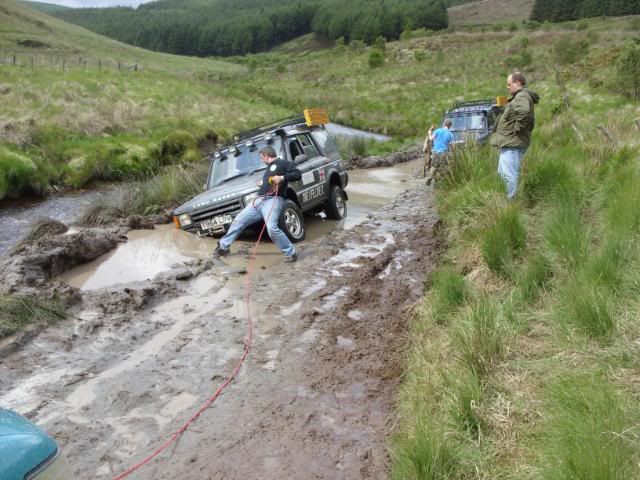
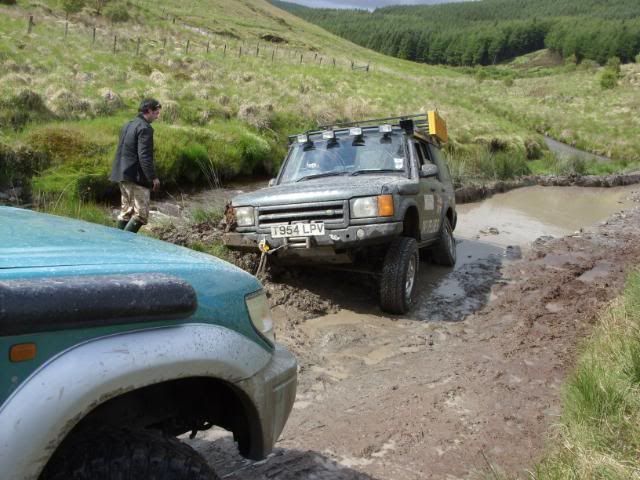
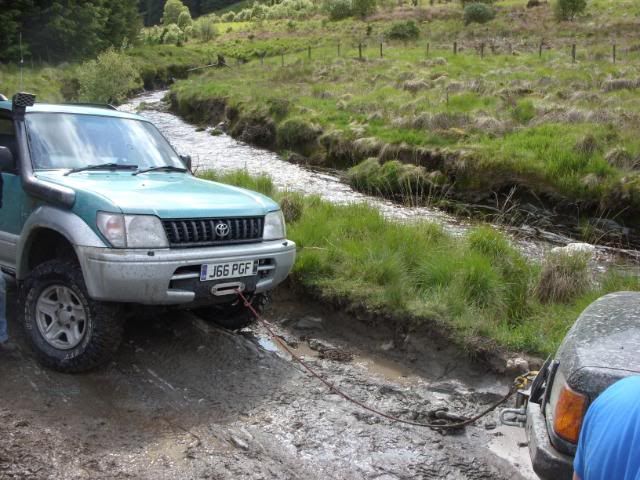
I used mine in anger last week and I have to say did the job nicely, I was pulling the green oval not the other way round
_________________
1998 Toyota Landcruiser Colorado 3.4 V6 (sold)
2001 VW 2.8 V6 Caravelle Surf Bus (sold)
2010 Passat Bluemotion Highline Plus (gone)
VW Amarok BiTdi |
|
| Back to top |
|
|
|
|
|
You cannot post new topics in this forum
You cannot reply to topics in this forum
You cannot edit your posts in this forum
You cannot delete your posts in this forum
You cannot vote in polls in this forum
|
|

